|
What is CassetteDV?
CassetteDV is
a software that will delight all digital
video hobbyists having dozens of cassettes without
remembering what's on them. Its main goal
is to create a database of all cassettes, and
of all their scenes. One can then find
easily one or several scenes by browsing through
the thumbnails, and recapture when needed
a selection of scenes to a video clip.
It has many strong points:
 everything is automatic (except to insert
the tapes and make some clicks): the
boring step of indexing with keywords
is no longer compulsory. CassetteDV
catalogues automatically whole cassettes
creating thumbnails for the scenes.
If you want to use keywords, it's also
possible but it's never compulsory.
everything is automatic (except to insert
the tapes and make some clicks): the
boring step of indexing with keywords
is no longer compulsory. CassetteDV
catalogues automatically whole cassettes
creating thumbnails for the scenes.
If you want to use keywords, it's also
possible but it's never compulsory.
while the tape is played for cataloguing,
you can create a DV or Divx video file
from the whole cassette:
it saves much time.
For example, you may catalogue your cassettes
and burn for each of them a CD containing
a Divx video of the cassette. You may
even create simultaneously the Divx file
and a DV type 2 file for video editing.
On my computer with a 3 GHz processor,
this "triple play" of cataloguing,
capturing to Divx with mp3 audio, and
capturing to DV type 2 takes
only about 40% of CPU power. So it's
possible to surf on the web while all
this work is done in the background.
And it's not all, because CassetteDV
can also create a scn file to
open faster the video file in Studio from
Pinnacle.
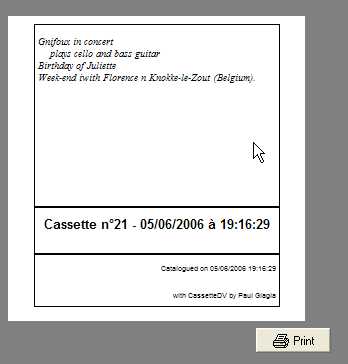
you can print a cover for your cassettes:
When you are done cataloguing a cassette,
and have given it a title and
description, you may print
a cover for the cassette having the
same title, and description. Thus the
cover will contain exactly the same
text as the database.
you can find scenes by their date of capture:
CassetteDV relies massively on datecode,
that is to say the date of capture for
each scene. This data is kept in the
database and can be used to filter the
scenes and find the desired ones among
all scenes.
you can recapture a selection of scenes
to a video clip by drag and drop: You
drag the thumbnails of the selected
scenes to the selection window, and with
one click recapture them to a video
clip either in Divx or in DV (or even
both at the same time). CassetteDV
will optimize the recapturing. It will ask
you to insert a tape, will rewind it,
and will read the scenes in the order
of appearance on the tape and will prompt
you for the next cassette when needed. All this
is very comfortable.
CassetteDV is not afraid by timecode
gaps on a tape: it can process a
cassette entirely, even if there are
gaps in the timecode,
or changes in audio format, or even blank
zones without any video information.
It uses an extended timecode that permits
to know what "section" of
the tape is being read, a section being
a seamless zone on the tape. The main
goal is to give a complete description
of each cassette. Therefore, even the
blank portion of tape at the end is
displayed with its duration.
CassetteDV can resume the catalog operation
on a cassette,
starting from a given scene until the end of the cassette. It is useful
if you have recorded a new video sequence on a tape that has been
previously catalogued, or if you had cancelled the operation of
cataloguing and want to resume it later.
CassetteDV needs no
installation: You will only have to
tell at first launch the name and
location of the database that it
should create . It installs no directshow
filter, and does not disturb your system.
It saves only its preferences into the registry, but
a command is provided to delete them
with a simple click if you want to restore
your register completely unchanged.
CassetteDV is very flexible with databases:
it can create new ones,
browse between several databases as if they
were a single one, disable some of them
temporarily. Databases may be archived
on CD or DVD. A database for CassetteDV is
rather small on the devices: you could
catalog an average of 1000 cassettes
containing 300.000 scenes
on one DVD.
back
to top
Download
the latest version of CassetteDV
CassetteDV
is freeware granted only for personal use. Any
use by a company, an administration or during
professional activities is not permitted
and therefore unlawful. If you need to use
it in such circumstances, please ask
me for a license. CassetteDV may be freely
distributed, if it's for free and for personal
use. It is not open
source, so please don't ask me for the source
code.
CassetteDV
is provided to you AS IS without any
warranty. Use it at your own risks. It obeys
to the principle: "It works well
for me, it could work well for you, but
perhaps not. Try it by yourself and
please report your remarks to help me improve
my products". Let me remind you that I am not a professional
developer, and I am not able to test my
products on all different systems existing
on the market.
Actually, my experience, with
more than 400.000
visitors of my web pages, shows that my
products are well working for a great majority of
users, but not strictly for 100 %. In fact,
is this
really different from most commercial packages?
|
|
Download
(780 Kb):

Version 3.0.2
published
on Wednesday, June 1st, 2006
|
|
The most recent update of CassetteDV is
version 3.0.x to download above in English. A french version is to download here  . CassetteDV has been tested
under Windows
XP SP1 and SP2. It needs directX
9.0 or better. To capture in Divx, you must
have installed on your system a Divx or Xvid
codec. To compress audio to mp3, you
must also install the free codec Mp3 lame from Elecard. I
recommend the version that is to download
on the Elecard
freeware page under the title MPEG Layer III Audio Encoder. If
you do not know how to install lame.ax,
then download this
little zip and follow the instructions of
its readme
file.
. CassetteDV has been tested
under Windows
XP SP1 and SP2. It needs directX
9.0 or better. To capture in Divx, you must
have installed on your system a Divx or Xvid
codec. To compress audio to mp3, you
must also install the free codec Mp3 lame from Elecard. I
recommend the version that is to download
on the Elecard
freeware page under the title MPEG Layer III Audio Encoder. If
you do not know how to install lame.ax,
then download this
little zip and follow the instructions of
its readme
file.
back
to top
How
to get started with CassetteDV:
1) Launch CassetteDV
After
download,
unzip the file CassetteDV_30xen.exe
in a folder and double-click on it. No installation is
needed. For the first use , you will
be prompted by a panel containing important
warnings. Read it.
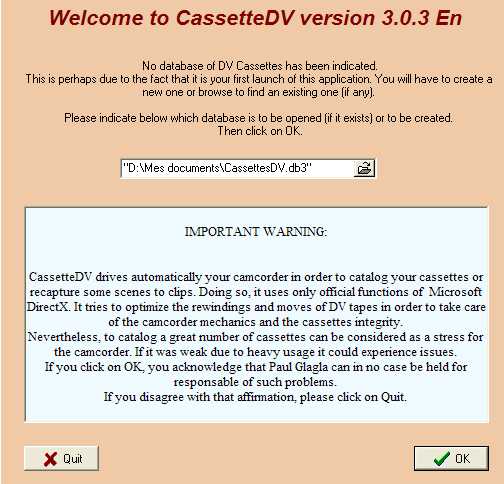
Then
choose a name and a folder for the database
where all you cassettes and scenes will
be catalogued. By default you can keep
the proposed name CassettesDV.db3
in the folder My Documents.
The database will become more and more bigger
when you catalog more cassettes, but
will stay at a reasonable size. Let's
say between
1 and 3 Mbytes per cassette. So you
may catalog a thousand in the size of
one DVD. You may of course save the
base on a CD or DVD if it becomes bigger. It's
even recommended in order to have a
safe copy of your precious database.
Then type OK.
If
you had already a correct database,
perhaps created with a former version
of CassetteDV, you can open it
instead of creating a new one.
Version 3.0.x works with a new database
structure, so you will have to wait
some time for an update of your old
database.
If
your screen is configured in anything
else than 1024x768,
then CassetteDV will propose to change
the screen resolution because it is
more comfortable to work with it at
this resolution. Of course you may refuse
this proposal. Anyway, if you accept,
CassetteDV will restore your
present screen configuration when it
closes.
2) Cataloguing the first cassette:
For
now the database
is still empty, so CassetteDV gets
into Catalog
mode and becomes ready to catalog the
first cassette.
If it's not yet made, plug your DV camcorder on
a firewire plug and put it ON in
VCR mode with the cassette inside. The
video window should then automatically
be displayed.
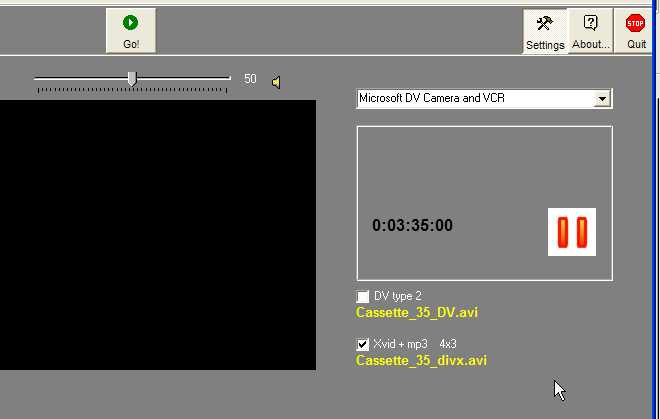
Now
check the video files that you want
to be captured in real-time during the
catalog operation, either in DV or Divx
(or Xvid) format or even both. You should
also, at least for the first capture,
check the settings in the settings panel (F10)
under the tabs capture DV or
Capture Divx : folder,
name, DV type, Divx codec, if a scn file
is wanted etc...If the
Divx or mp3 codecs are not found,
CassetteDV will give you some
indications about what is missing.
Click
then on the button Go! to
start the operation:
first the tape is rewinded completely,
then the cassette is read and a thumbnail
gets displayed for each scene as soon
as it is read. Sometimes the scene is
blue with a duration displayed on it.
It means either that a portion of the
tape was blank and not recorded at all,
either that there were dropped frames (in
this case the duration is generally 0).
The first situation is normal and let's
you have a complete description of your
cassette even of empty zones. You will
notice that the section number increases
in this case. The second case is generally
due to a lack of power either for the
CPU (Divx compression needs CPU power)
or for the hard disk (recording DV needs
a high capture rate). In this case the
section number does not increase. If
there are many blue scenes of this kind,
you may want to stop the operation and
make some changes before restarting
it. If you want to stop, click
on the Stop!
button,
then on the Browse
button, delete the cassette that was being
catalogued by typing CTRL+Del
and come
back to the catalog mode with the button
Catalog
and
start again. Of course in the meantime,
you will have closed some programs wasting
CPU time or interfering with access
to hard disks, like antivirus applications
or all applications that scan the hard
disk.
You
may also keep the beginning of the cassette
and only recatalog starting from a given
scene with the button Resume.
For
complete help about the Catalog process, read
the Catalog
page here
back
to top
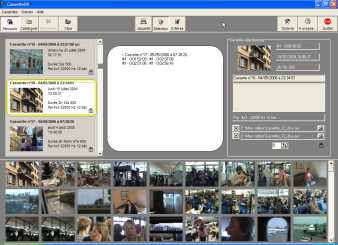
3) Browse the database of cassettes:
When
you are done cataloguing a new cassette,
go to Browse mode
by clicking on the button with the same
name. The list of all cassettes (containing
only one item after the first session)
is displayed on the left of the window.
At the bottom you can see the thumbnails
of the scenes from the selected cassette. The
list of all cassettes can be displayed
as a list of names or as a list of thumbnails.
Toggle from one view to the other by
typing F11.
You may navigate in the list with the scroll
bar, with the wheel mouse or even with
the arrow keys of the keyboard.


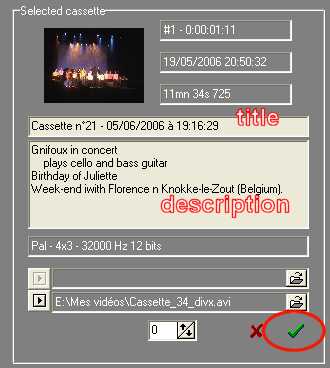
You
should now give a title and a description
to the catalogued cassette. Write them
in the panel at the right of the window,
and click on the OK button
(green mark) when done, in order to
record these data to the database.
After
that, it's time to print a cover for
your cassette. CassetteDV uses
the given title and the description and
prepares a cover that can be printed
on any sheet of thick paper. You will
only have to cut the edge
and make a mark on the folds with a sharp
tool (I use a screwdriver tor that). You
will get a cover with exactly the same
title than indicated in the database.
This is useful for later captures based
on the database.
4) Recapture scenes to a clip
When
you are in Browse mode,
click on Selection to
display the selection window. Select
scenes by clicking on their thumbnails
at the bottom. To select a series of
scenes keep the Shift down. You
can then drag the scenes to the selection
window and drop them there.

If
necessary, select a new cassette in
the list at the upper left, select some
of its scenes and drag and drop them
to the selection window. Repeat this
operation, until the selection window
contains all desired scenes. Then click
on the button Clips,
and act as for a catalog operation:
check the files to be captured (DV and/or
Divx), click on Go! During recapture, CassetteDV drives
the camcorder and manages the cassettes:
it rewinds them at first, plays fast
forward until some seconds before the
desired scene, and then captures exactly
this scene. When necessary it tells
you to insert the next cassette. The
video window does at this stage only
display the recaptured scenes. It stays
black when the tape is on a position
where the frames are not captured. When
done, you get one (or two) files containing
exactly the selected scenes and only
those.
To
get more help about the function
Recapture to clips, see the Recapture
to clips page here
Enjoy
now the program and discover by yourself
more functions. Many hints can be displayed
by controls, and explanations are given
in the settings panels. Don't forget
to save periodically your database.
You will find it as a file of type *.db3
in a folder that you can find in the
settings panel, (F10)
under the tab Databases.
back
to top
Home
- CassetteDV
- Catalog
- Clips
|