|
Click on my photo
Visit my pages about video        
Visitez mon site en Français
This page is better viewed in 1024x768.
Last update on Sunday, June 11, 2006 |
How to recapture scenes to clips with CassetteDV |


|
|
|
|

|
Select the scenes:
A very nice feature of CassetteDV is the capacity to recapture from the original tape a list of scenes by simple drag and drop of the corresponding thumbnails to the selection panel. Why should you recapture scenes? Generally it's for making a video composed of scenes from different cassettes. Suppose you want to make a video of the childhood of your daughter which is going to be married. Sometimes it's even simpler: you need to find and recapture one precise scene, but you don't remember where it is. For instance you want to reuse a nice sunset over the Aegean sea to insert it into a video project. CassetteDV let's you find very easily the interesting scenes and recapture them into an avi file without effort from the original cassettes. Imagine the hassle without CassetteDV: first the number of cassettes that you would have to read to find the useful scenes, the number of rewindings and forwardings of yours tapes...
To find scenes catalogued with CassetteDV, you may filter the cassettes and scenes displayed. If you have less than a dozen, it's still possible to browse directly among them and look for thumbnails. If there are hundreds, it's obviously better to filter them in order to limit the number to browse among. Click on the button Criteria or type F8. The window of Criteria 'is displayed.
You can here enter a list of keywords for filtering the cassettes: For example: if you enter the keywords Greece, holidays, sea for the title, it will display the cassettes with title: Holidays in Greece 2004, Greece 2004 (2), Holidays in Italy 2001, and Week-end at the sea in Normandy. The more keywords, the more cassettes will be displayed, because one match is sufficient to display the cassette. Since version 3.0, you can also filter the scenes displayed, in order to find quickly the scenes that you will recapture to a clip. You may similarly impose keywords, but also a date of capture between two given dates. Be aware that if you have set criteria for cassettes, only scenes complying with the criteria for scenes, and those cassette comply with the criteria for cassettes are displayed. It could be that some other scenes comply with the criteria for scenes, but are in cassettes not complying.
When you have set the criteria, and have checked the corresponding checkboxes, click on the button Apply in order to apply the filter. To remind you that a filter is active and all stuff may not be displayed, the toolbar at the top becomes purple. At any time the button All will display again all the cassettes and scenes.
When you are done, you will have to browse the scenes at the bottom of the window. With F11 you can toggle the display mode between a text list and a thumbnail list. The scrollbar or the wheel from the mouse are useful to display fast all the cassettes. Select a cassette with a click on it, or with the arrow keys. When a cassette is selected, its scenes are displayed at the bottom of the window, and can be browsed with a scrollbar or the wheelmouse.
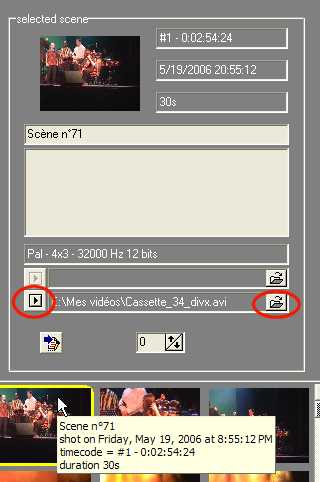
When the mouse moves above the thumbnail of a scene, it displays data like datecode, timecode, duration. When you click on a scene, it's details appear in a panel at the top right of the window..
If there exists a video file associated with the scene (DV or Divx) then you can click on the button Play to read just this scene in a video window. It's useful to verify that the scene is worth recapturing. If you have thousands of scenes, it's of course impossible to remember exactly what's on each, and it's a great help to be able to watch a scene before recapturing it. If the video file exists elsewhere, for instance on a CD-Rom that has been burnt with the original Divx file, you can insert the CD-Rom in a CD player and indicate the new location of the file by clicking on the icon at the right of the old filename.
When done, open the Selection panel or type F7 . Then drag and drop the selected scenes with your mouse from the thumbnails to the selection panel. You may also directly drag them to the Selection button. Alternatively, you may open a popup menu with a right click on scenes and click on the command Select. In the panel of details for a selected scene, you may click on the button Add to selection. The main menu has also a command Add to selection in the menu Scenes and there is an equivalent keyboard shortcut with CTRL+Z applying on a selected scene.
Remember that a scene may have several thumbnails, that can not be separated (unless you have unchecked the box Link the Scenes in the settings panel (F10 - tab Preferences). They will be selected altogether.
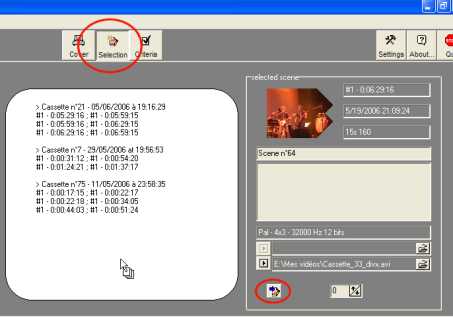
The scenes added to the selection panel are sorted by their timecode boundaries, and grouped by cassettes. This is very interesting to optimize the recapturing operation with at least tape moves as possible.
Recapture to a clip
When the scenes have been listed in the selection panel, click on the button Clips or type F4. You enter in the mode "Recapture to Clips" with a page that looks like the page of mode "Cataloguer". If a DV camcorder is plugged on a firewire link, is put ON and in VCR mode with a cassette inside, then the button Go! becomes active in the middle of the upper toolbar, and a video windows appears. If not, a panel invites you to do the proper operations. CassetteDV waits until you have done it, and will detect it automatically.
Depending on the parameters from the Settings panel, CassetteDV proposes to recapture the scenes to a video clip in DV format (type 1 or type 2) and a clip in Divx format (or Xvid) with audio in PCM or mp3.. The corresponding files are indicated in yellow under the VCR panel. Check if you want a DV clip or a Divx clip or both. You must here check at least one box otherwise there is nothing to recapture to. Verify also if you have enough free space on the hard disk. Her is a trick: when you click on a yellow filename, it opens the folder where the clip is to be saved. You may then delete some previously captured files if necessary. Many settings may be modified in the Settings panel (F10) , for instance the folder in which to save the clips, the root used to make the name of the clip (by default clip) , if a scn file is to be produced, and all configuration parameters for Divx, audio, DV ... The page Catalog explains how. The same parameters apply for recapturing as for cataloguing.
Some users make remarks about the fact that all scenes are recaptured to a single common clip and not in separate clips. You may of course recapture the scenes one by one if you want separate clips. Capturing to one single clip is not an issue if your editing software can identify the individual scenes in the clip. For example if you use Studio of Pinnacle you should ask for a scn file (check a box in the settings - F10 tab Capture DV). CassetteDV will produce the scn file and the scenes will then be opened in Studio as if they were on separate clips.
When you are ready click on Go! All the recapture operation will begin automatically. You will only be prompted from time to time to insert a given cassette into the camcorder. The cassette will be designated mainly by its title, so let me remind once again that it is important to have a good naming strategy for the cassettes, and to print exactly the same title on the cassette than in the database. The integrated cover print command is useful for that. When prompted you may Ignore a cassette for example if you do not find it despite my warnings. ,You may also Cancel the whole recapture operation.
When a cassette is inserted, CassetteDV rewinds it completely to be sure to recognize the good section of the tape (a section is a zone of the tape without gaps in the continuous timecode).
During recapture, the timecode will be displayed in the VCR panel at the top right of the window and indicates the current position in the tape. But the central video window will remain black except when a selected scene is being recaptured. You will see that CassetteDV goes a few seconds before the start of each scene in order to recapture it precisely. During these preliminary seconds or during rewind and forward proceeding no image is displayed in the video window.
During recapture, don't do any heavy jobs on your computer, with intense access to the hard disk (specially if you recapture in DV) or putting a heavy charge on the processor (specially if you recapture in Divx). As far as I am concerned, I do not close the antivirus that works in the background, but I close some routines scanning or indexing the files in the hard disk like Findfast.exe launched by Microsoft Office 97. On the other hand I can surf on the web or program in Delphi while the recapture operation is proceeding in the background.
When a scene is recaptured, CassetteDV displays a thumbnail at the bottom of the window. Be conscious that these scenes are not re-catalogued in the database, so the list of all these thumbnails is only a temporarily list available only while in Clips mode. When all scenes are recaptured, the process stops automatically.
While recapturing scenes to a clip, the button Go! changes to a button Stop!. If you click on it, the recapture operation is stopped, as if the end had been reached. You keep all that has been recaptured in the clip, but the last scene is perhaps not complete. A broken scene will be displayed with tears to remind that is not complete.
After recapturing scenes to a clip:
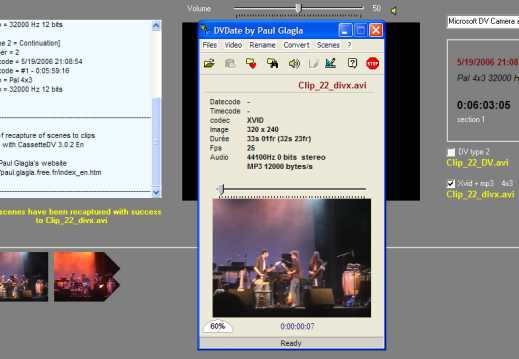
When a clip has been recaptured, you may access on it by clicking on its yellow name under the VCR panel. If my application DVdate, is available on your system, you can also open the captured clips in DVdate, by typing F5. If you have DVdate, but the key F5 does not work, verify in the settings (F10 tab Preferences) if CassetteDV has found the executable file for DVdate, or else indicate the correct location. If you prefer other applications (able to open avi files), you can mention another executable here. For example VirtualDub would be OK if you want some post-production of the file. But VirtualDub can only open one file at a time, where DVdate can open all files at once. And remember that DVdate can launch virtual dub or any other application with one key.
Home - CassetteDV - Catalog - Clips
|