


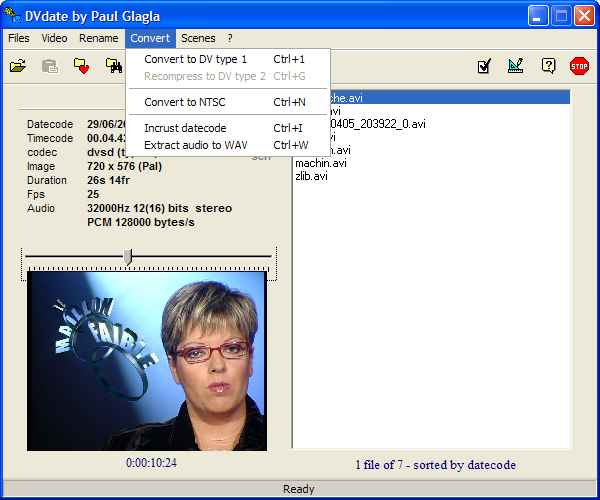
The menu Convert of DVdate


Help pages about DVdate:


![]()
![]()
This page is better viewed in 1024x768.
Last update on
Monday, December 11, 2006

The menu Convert of DVdate
All commands of the menu Convert are applied to all the selected files in the playlist. Remember that the available commands may vary with the selected files. Some of them are only enabled with DV files, or even DV of type 2, others only with files having datecode, others with non DV files only, etc... Remember also that you can abort a command by typing Esc on the keyboard, and even abort all commands by typing Shift+Esc.
![]() Convert into DV type 1
or CTRL+1: all
clips selected in the playlist of kind DV type 2 will
be converted into DV type 1.
Actually this command does not modify any existing
file, but creates a new file with the suffix
'_type1' added to the filename. This
operation makes no recompression and keeps
strictly the same quality of images and
audio as the original file.
By default, the new file is created in the
same folder than the original one. This
may be changed in the
Settings
of DVdate, where you may indicate
a folder for all files created by conversion.
Convert into DV type 1
or CTRL+1: all
clips selected in the playlist of kind DV type 2 will
be converted into DV type 1.
Actually this command does not modify any existing
file, but creates a new file with the suffix
'_type1' added to the filename. This
operation makes no recompression and keeps
strictly the same quality of images and
audio as the original file.
By default, the new file is created in the
same folder than the original one. This
may be changed in the
Settings
of DVdate, where you may indicate
a folder for all files created by conversion.
![]() Convert into DV type 2
or CTRL+2: all
clips selected in the playlist of kind DV type 1 will
be converted into DV type 2.
Actually this command does not modify any existing
file, but creates a new file with the suffix
'_type2' added to the filename. This
operation makes no recompression and keeps
strictly the same quality of images and
audio as the original file.
By default, the new file is created in the
same folder as the original one. This
may be changed in the
Settings
of DVdate, where you may indicate
a folder for all files created by conversion.
Convert into DV type 2
or CTRL+2: all
clips selected in the playlist of kind DV type 1 will
be converted into DV type 2.
Actually this command does not modify any existing
file, but creates a new file with the suffix
'_type2' added to the filename. This
operation makes no recompression and keeps
strictly the same quality of images and
audio as the original file.
By default, the new file is created in the
same folder as the original one. This
may be changed in the
Settings
of DVdate, where you may indicate
a folder for all files created by conversion.
![]() Recompress to DV type 2
or CTRL+G: all
clips selected in the playlist that are
AVI non DV (for instance DivX, MJPG etc...) will
be converted into DV type 2.
Actually this command does not modify any existing
file, but creates a new file with the suffix
'_dvtype2' added to the filename. This
operation recompresses the video, and thus
looses some quality. Furthermore it does
not keep the aspect ratio of the video,
but converts it to a DV 4x3 aspect
ratio or 16x9 (but in fact either 720x576 in Pal or
720x480 in NTSC). By default, the
new file is created in the same folder than
the original one. This may be changed in
the
Settings
of DVdate, where you can indicate
a folder for all files created by conversion.
In the preferences of DVdate,
one can also set the TV standard of the
newly created DV file between Pal and NTSC.
Recompress to DV type 2
or CTRL+G: all
clips selected in the playlist that are
AVI non DV (for instance DivX, MJPG etc...) will
be converted into DV type 2.
Actually this command does not modify any existing
file, but creates a new file with the suffix
'_dvtype2' added to the filename. This
operation recompresses the video, and thus
looses some quality. Furthermore it does
not keep the aspect ratio of the video,
but converts it to a DV 4x3 aspect
ratio or 16x9 (but in fact either 720x576 in Pal or
720x480 in NTSC). By default, the
new file is created in the same folder than
the original one. This may be changed in
the
Settings
of DVdate, where you can indicate
a folder for all files created by conversion.
In the preferences of DVdate,
one can also set the TV standard of the
newly created DV file between Pal and NTSC.
![]() Convert into NTSC or
CTRL+N: all
clips selected in the playlist that are
in format DV Pal will
be converted into DV NTSC.
Actually this command does not modify any existing
file, but creates a new file with the suffix
'_ntsc' added to the filename. This
operation recompresses the video, and thus
looses some quality. Furthermore the video
is deinterlaced with an internal deinterlacer
before recompression so
the horizontal movements may be less fluid
when watched on TV. But It's a simple, fast
and free method and I find the results,
when burnt on a DVD at last not too bad.
Convert into NTSC or
CTRL+N: all
clips selected in the playlist that are
in format DV Pal will
be converted into DV NTSC.
Actually this command does not modify any existing
file, but creates a new file with the suffix
'_ntsc' added to the filename. This
operation recompresses the video, and thus
looses some quality. Furthermore the video
is deinterlaced with an internal deinterlacer
before recompression so
the horizontal movements may be less fluid
when watched on TV. But It's a simple, fast
and free method and I find the results,
when burnt on a DVD at last not too bad.
![]() Convert into Pal or
CTRL+P: all
clips selected in the playlist that are
in format DV NTSC will
be converted into DV Pal.
Actually this command does not modify any existing
file, but creates a new file with the suffix
'_pal' added to the filename. This
operation recompresses the video, and thus
looses some quality. Furthermore the video
is deinterlaced with an internal deinterlacer
before recompression so
the horizontal movements may be less fluid
when watched on TV. But It's a simple, fast
and free method and I find the results,
when burnt on a DVD at last not too bad.
Convert into Pal or
CTRL+P: all
clips selected in the playlist that are
in format DV NTSC will
be converted into DV Pal.
Actually this command does not modify any existing
file, but creates a new file with the suffix
'_pal' added to the filename. This
operation recompresses the video, and thus
looses some quality. Furthermore the video
is deinterlaced with an internal deinterlacer
before recompression so
the horizontal movements may be less fluid
when watched on TV. But It's a simple, fast
and free method and I find the results,
when burnt on a DVD at last not too bad.
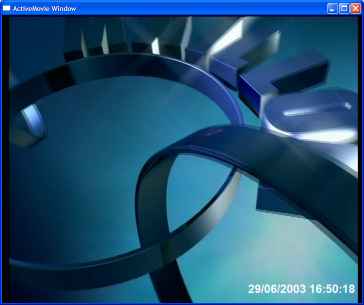
![]() Inlay or
CTRL+I:
all
clips selected in the playlist that are
in format DV will
be converted into a DV file of the same
format, but showing the current datecode
or timecode burnt in each frame.
Actually this command does not modify any existing
file, but creates a new file with the suffix
'_in' added to the filename.
In the new video, the datecode will be displayed
like in the following frame.
Inlay or
CTRL+I:
all
clips selected in the playlist that are
in format DV will
be converted into a DV file of the same
format, but showing the current datecode
or timecode burnt in each frame.
Actually this command does not modify any existing
file, but creates a new file with the suffix
'_in' added to the filename.
In the new video, the datecode will be displayed
like in the following frame.
I hope you will appreciate this rare function, specially regarding the fact that DVdate is free for personal use, and considering some nice features of this command: first of all the exact datecode is extracted from each frame and incrusted into the same frame (and only when it exists) . Then you may highly personalize the incrustation mode in the Settings panel - tab Preferences.
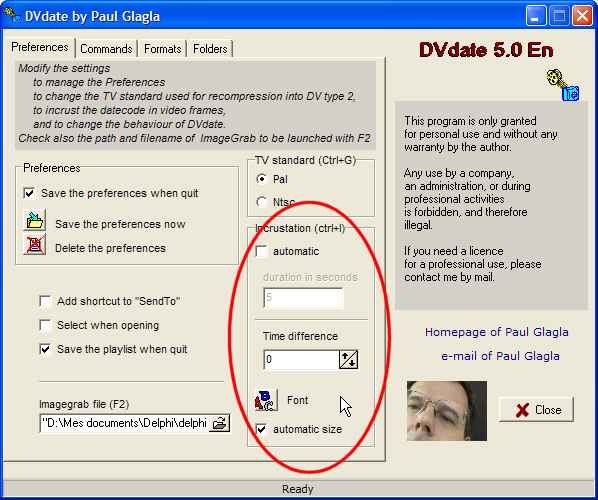
You may choose here the font of the incrustation by clicking on the button Font, for example change the font name, its color, even its size. I recommend however to check Default size, and let DVdate calculate the size of the font according to the size of the video..
You may also adjust the datecode incrusted into the video, and add or subtract some hours from the original datecode, for instance if there is a time difference or a summer time change that has to be fixed. When I travel abroad I often miss to set the local time in my camcorder, so the recorded datecode is not the real time. It's interesting to correct the time before inlaying it into the video.
Finally, you may set an automatic incrustation, for a duration given in seconds, and beginning at each scene change (scene changes are detected when the datecode is discontinuous), or day change by checking the box "automatic" and setting below a duration.
The position of inlay is adjustable. For instance click with the right mouse button on the video windows and click again on the command Modify the position of Inlay. You may also type Alt+I on the keyboard. Two sliders will be displayed. When the sliders are visible, change their position and the position of inlay will change. You may also directly click on a place in the video window to put the position on that place. It's useful in fullscreen mode, where you may realize how the datecode will be displayed.
The button ![]() shows (or hides when it is
shows (or hides when it is ![]() )
the display of datecode or timecode in the
preview. So you may view it when the video plays and preview
before creating the xxx_in.avi
file with inlay data.
)
the display of datecode or timecode in the
preview. So you may view it when the video plays and preview
before creating the xxx_in.avi
file with inlay data.
![]() Fix a time difference: This
command displays a panel that has two interfaces. If the
box Advanced is
not checked then you may only change the datecode by adding
or subtracting an entire number of hours. If it is checked,
then you may change the datecode by any difference from
days until seconds.
Fix a time difference: This
command displays a panel that has two interfaces. If the
box Advanced is
not checked then you may only change the datecode by adding
or subtracting an entire number of hours. If it is checked,
then you may change the datecode by any difference from
days until seconds.


When you click on OK, the command creates a new filer (in the same folder unless you have set otherwise in the preferences ) called like xxx_(+x h y mn z s).avi if the original file was called xxx.avi and if the time difference is x hours, y minutes and z seconds. This new file is very similar to the original one, except for the datecode written in the frame with a difference. It is useful if you -like I do - miss to adjust the internal clock of the camcorder when travelling abroad, or when there is winter time after summer time.
![]() Extract audio or
CTRL+W:
It creates for
all files selected in the playlist a WAV
file containing the audio stream of the video
file. The new WAV file
is not an AVI file, so it cannot be loaded
into the playlist of DVdate. You
will find it in the same folder as the original
AVI file (click on its name in the information
panel to open the folder), or in an extra
folder if you have set one for all files
created by conversion in the Settings.
Extract audio or
CTRL+W:
It creates for
all files selected in the playlist a WAV
file containing the audio stream of the video
file. The new WAV file
is not an AVI file, so it cannot be loaded
into the playlist of DVdate. You
will find it in the same folder as the original
AVI file (click on its name in the information
panel to open the folder), or in an extra
folder if you have set one for all files
created by conversion in the Settings.