


The Scenes Editor of DVdate
to manage and export scenes of any video file
Download
DVdate:

Help pages about DVdate:


![]()
![]()
This page is better viewed in 1024x768.
Last update
on Monday, April 21, 2008
Launch the Scenes Editor
The Scenes
Editor reads the content of a
scn file, can modify it easily, and save it back. This
is useful to fix manually the list of scenes when an automatic
detection process had some defects. Open it with the command
Edit the scenes
or ALT+E
oe else the button ![]() .
But before launching it, select a video in the playlist
of DVdate. The Scenes
Editor processes only the active
video in the playlist (whose video is displayed)
even if several files are selected.
.
But before launching it, select a video in the playlist
of DVdate. The Scenes
Editor processes only the active
video in the playlist (whose video is displayed)
even if several files are selected.
Create also if necessary a scn file, with a command from menu Scenes. Let's remind that there are three means to create a scn file with DVdate:either Create a scn file with content - this method analyses the images and considers a new scene when two consecutive images are sufficiently different; either Create a scn file by datecode - this method is only available for DV files having datecode. A new scene is created when there is a gap in the datecode;either Create a scn file with fixed durations - this method simply cuts the video in scenes of a given duration.
It is not compulsory to create a new scn file if such a file already exists, for instance created by Studio of Pinnacle. But the file must have the same name as the video (except extension scn) and must be placed in the same folder. If you launch the Scenes Editor without any scn file, then DVdate will consider by default that the whole video is one single scene.

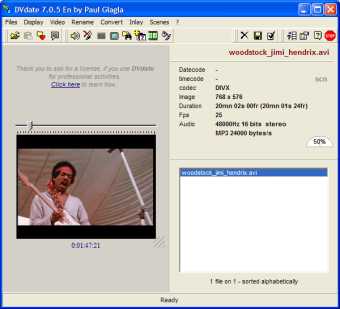
Once a video selected, and a scn file made available, you can launch the Scenes Editor and obtain it's colored face instead of the playlist. See also that four buttons have been added to the tool bar.

The Scenes Editor displays at the bottom a list of scenes. By default the list shows a title limited to a scene number. In fact the real title is even empty, the scene number is added to find a scene in the list. If you browse through the list of scenes, either by clicking on a scene, or by moving the selected scene with an arrow key, it updates some data according to the selected scene: the video, the thumbnail, and some information about the scene.
First of all, the video is restricted to the selected scene. It can play like in the normal mode of DVDate, but it will stay in the selected scene. For example, with CTRL+End you won't go to the end of the video, but at the end of the scene instead.
Some data is updated: the scene number, the timestamp of the scene start (same as the first timestamp under the video), the duration, the timecode, the datecode (if any). The thumbnail represents an image from the scene, by default the first. In a edit box, by default empty, you will find the title and subtitle of the scene, in fact two lines of text that can be edited.

If you work with Pinnacle's Studio, all this stuff should correspond to the stuff displayed in Studio, when comments are requested:

Change the titles
The title and subtitle of a scene is a text on two lines that is displayed in Studio when you ask the scenes to be with comments. It is also used when exporting the scenes (to Word, Excel, OpenOffice.org...) with DVdate. Thus it's interesting to personalize them.
To change ttitles and subtitles,
click on the button ![]() or simply clilck in the edit box. It will open a new window
for editing titles and subtitles.
or simply clilck in the edit box. It will open a new window
for editing titles and subtitles.

There you should indicate a "template" to build titles and subtitles, using eventually the indicated codes, for example %D for the datecode or %T for the timecode. When done, click on the button Apply, if you want the template to be applied only on the selected scene, or click on the button All, if you want it to be aplied on all scenes of the selected video.
An example: Put Scene %N: %D on the first line and Duration = %U on the second one. You will get the titles and subtitles displayed by default in Studio. Besides a button marked Studio has been set to give this template. Another button gives an empty template to clear the title and subtitle.
You can of course put something more specific like My holidays in Canada %N or even a non generic title applied only on one scene: The market place at 2 o'clock.
Once the template defined, click on Apply or on All in order to implement the modifications. The list of scenes will display the title of each scene, but adding before each title Scene X:, it is not very aesthetic, but it will not remain when displayed in an exported list of scenes or in Studio.

Change the thumbnail
To change a thumbnail, put the video to the desired position in the scene (with CTRL+arrays), where the new image is displayed. Then click on the video. The thumbnail is automatically updated. Reciprocally, if you want the video to go to the position of the thumbnail, then click on the thumbnail. THe video will automatically go to the desired position.
Insert a scene
When browsing
through the video (either in Play mode, or in Pause
state using the keys CTRL+arrows)
you may find a frame that should be the start of a new scene,
but was omitted. Click the on the button
Insert
![]() ,
and you will automatically get a new scene starting at the
given frame. In fact inserting a scene is equivalent to splitting
the current scene in two at the indicated position.
,
and you will automatically get a new scene starting at the
given frame. In fact inserting a scene is equivalent to splitting
the current scene in two at the indicated position.
The Scenes Editor will try to update all titles and subtitles according to the new situation, for example by changing scene numbers, and duration of the modified scenes.
If there
is a scene in the list that was falsely detected as a new scene,
select it and click on the button Delete
![]() .
In fact, deleting a scene is equivalent to merge it with
the previous one.
.
In fact, deleting a scene is equivalent to merge it with
the previous one.
The Scenes Editor will try to update all titles and subtitles according to the new situation, for example by changing scene numbers, and duration of the modified scenes.
Save the scenes
When you
are done modifying the list of scenes, save it to the scn
file associated with the selected video by clicking on the button
![]() .
If you close the Scenes
Editor without having saved the
list of scenesn then you will be prompted for saving or confirmation
not to do it.
.
If you close the Scenes
Editor without having saved the
list of scenesn then you will be prompted for saving or confirmation
not to do it.
You may also export the scenes to a text file, to Word, Excel or OpenOffice.org, even without saving them to a scn file, with the commands from the menu Scenes.