


The menu Inlay of DVdate
to superimpose the datecode and other data on the videos
Download
DVdate:

Help pages about DVdate:


![]()
![]()
This page is better viewed in 1024x768.
Last update
on Sunday, April 20, 2008Saturday, April 19, 2008
 The
menu Inlay of DVdate
The
menu Inlay of DVdate
click on a menu command to go to the corresponding paragraph

There are three different
ways to superimpose datecode or other data to the videos
with DVdate.
First of all, you may just display the datecode or other
data during preview of a video in DVdate. This is
done with the command Display
the Inlay or ALT+I
or the button ![]() .
Secondly, you may embed the datecode or other data into
the video. This is done with the command Inlay
in the video or CTRL+I.
Finally, you may create a subtitle file, with extension
srt containing separately from the video the data
to superimpose. Most multimedia player may then superimpose
it during play. It is done with the command Create
a srt file with subtitles
or Shift+CTRL+S.
.
Secondly, you may embed the datecode or other data into
the video. This is done with the command Inlay
in the video or CTRL+I.
Finally, you may create a subtitle file, with extension
srt containing separately from the video the data
to superimpose. Most multimedia player may then superimpose
it during play. It is done with the command Create
a srt file with subtitles
or Shift+CTRL+S.
With the command commande Edit the Inlay, you can personnalize what and when you want the Inaly to be produced.
![]() Display the Inlay or Hide Inlay
or
ALT+I or
click on the button
Display the Inlay or Hide Inlay
or
ALT+I or
click on the button ![]() :
this command activates or desactivates the inlay during
the preview in DVDate.
If nothing happens, check if the requested inlay is
compatible with the video selected:
for example if you request to superimpose datecode
or timecode when a video like
divx has none. With the command
Edit the Inlay
you may request a personalized inlay more compatible
with the video. Maybe you have requested an inlay only on
some events like scene changes and there is no scene change.
With the command Edit the
Inlay
you may request a permanent inlay. So remember that
to get a correct inlay, you will have to check What
to inlay and When
to inlay.
:
this command activates or desactivates the inlay during
the preview in DVDate.
If nothing happens, check if the requested inlay is
compatible with the video selected:
for example if you request to superimpose datecode
or timecode when a video like
divx has none. With the command
Edit the Inlay
you may request a personalized inlay more compatible
with the video. Maybe you have requested an inlay only on
some events like scene changes and there is no scene change.
With the command Edit the
Inlay
you may request a permanent inlay. So remember that
to get a correct inlay, you will have to check What
to inlay and When
to inlay.
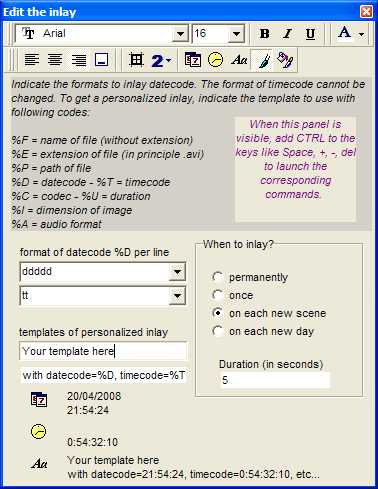
In this window, you have tool bars with buttons at the top to modify the font of the inlayed text: the first line is straightforward to choose the font name, the size, Bold, Italic, Underlined and the color of the font. Just notice that the size can be set to auto, that is an automatic size adapted to embed the datecode in videos, according to the size of the video. The second line neesds more explanations:
![]() aligns the two lines, either at left, centered,
or at right. In fact the bottom line remains still,
while the top line is aligned.
aligns the two lines, either at left, centered,
or at right. In fact the bottom line remains still,
while the top line is aligned.
![]() centers the two lines in the video image. Use it
to get a subtitle-like position.
centers the two lines in the video image. Use it
to get a subtitle-like position.
![]() sets the border size (black border) around the text.
Useful to have a constrast above some backgrounds.
sets the border size (black border) around the text.
Useful to have a constrast above some backgrounds.
![]() activates the inlay of datecode only, ie the date
and time where the video has been shooted by the camera.
The format of datecode may be set below.
activates the inlay of datecode only, ie the date
and time where the video has been shooted by the camera.
The format of datecode may be set below.
![]() activates the inlay of timecode only. The format
of timecode cannot be changed. It is always like 0.00.00.00
activates the inlay of timecode only. The format
of timecode cannot be changed. It is always like 0.00.00.00
![]() activatives the personalized inlay, according to
a template that you must set below.
activatives the personalized inlay, according to
a template that you must set below.
![]() This button is equivalent to the command Display
the inlay or
ALT+I.
This button is equivalent to the command Display
the inlay or
ALT+I.
![]() This button is equivalent to the command Edit
the Inlay or
ALT+J.
Here, it closes the Inlay Editor.
This button is equivalent to the command Edit
the Inlay or
ALT+J.
Here, it closes the Inlay Editor.
The Inlay Editor can also choose When to inlay, by indicating if the inlay is permanent, or happens only on seom events like scene change or day change. In this case the duration of inlay has to be precised.
Finally with the Inlay Editor you may define the format of the inlayed text:
If
you have requested to inlay the datecode only (by clicking
on the button ![]() ),
then you must indicate how the datecode will be displayed
and which part of it on each line. For example ddddd
gives the standard date of Windows (like 20/04/2008
in french)
and tt
give the standard time (like 20:49:18). If you set it
to dddddd
(6 times d) then you will have the day of the week (for example Sunday April
the 20th, 2008). You can also combine a variable number
of characters d,m,y
(day, month, year) or h,n,s
(hour, minute,second) with text between double-quotes.
),
then you must indicate how the datecode will be displayed
and which part of it on each line. For example ddddd
gives the standard date of Windows (like 20/04/2008
in french)
and tt
give the standard time (like 20:49:18). If you set it
to dddddd
(6 times d) then you will have the day of the week (for example Sunday April
the 20th, 2008). You can also combine a variable number
of characters d,m,y
(day, month, year) or h,n,s
(hour, minute,second) with text between double-quotes.
If
you requested a personalized inlay with the button ![]() ,
then you will have to set the template usinsg the give
codes. For example, you may embed the name of file with
extension by setting %F%E,
or combine datecode and timecode,
by setting %D
on one line and %T
on the other. It is easy to try different settings,
because an example is automatically updated next to the
template, and the inlay in the video is in real-time.
,
then you will have to set the template usinsg the give
codes. For example, you may embed the name of file with
extension by setting %F%E,
or combine datecode and timecode,
by setting %D
on one line and %T
on the other. It is easy to try different settings,
because an example is automatically updated next to the
template, and the inlay in the video is in real-time.
When the Inlay Editor is activated, then sliders are shown beside the video, and can be used to change the position of inlay.

NYou can also simply drag the inlay to a new position or click in the video to indicate the new position. In the bottom right corner of the video, there is also a clickable zone that activates or desactivates the Inlay Editor.
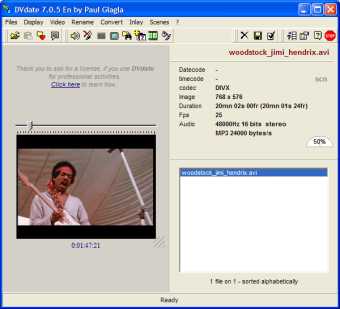
![]() Inlay or
CTRL+I:
all
clips selected in the playlist that are
in format DV will
be converted into a DV file of the same
format, but showing the current datecode
or any other data burnt in each frame (Set
the data to inlay in the Inlay Editor with ALT+J).
Actually this command does not modify any existing
file, but creates a new file with the suffix
'_in' added to the filename.
In the new video, the datecode will be displayed
like in the following frame:
Inlay or
CTRL+I:
all
clips selected in the playlist that are
in format DV will
be converted into a DV file of the same
format, but showing the current datecode
or any other data burnt in each frame (Set
the data to inlay in the Inlay Editor with ALT+J).
Actually this command does not modify any existing
file, but creates a new file with the suffix
'_in' added to the filename.
In the new video, the datecode will be displayed
like in the following frame:

![]() Create a subtitle file .srt or
Shift+Ctrl+S :
The command creates a subtitle file, of format srt, that
can be used with almost all multimedia players, provided
the DirectVobSub filters have been installed. The subtitles
are made from the data according to the Inlay Editor.
It can for example be the date and hour of capture displayed
for 5 seconds at each scene change. The *.srt file is in
the same folder than the avi file, with the same name except
for the extension. When a srt file has been created for
the selected file, then the sign srt is displayed
in the information panel.
Create a subtitle file .srt or
Shift+Ctrl+S :
The command creates a subtitle file, of format srt, that
can be used with almost all multimedia players, provided
the DirectVobSub filters have been installed. The subtitles
are made from the data according to the Inlay Editor.
It can for example be the date and hour of capture displayed
for 5 seconds at each scene change. The *.srt file is in
the same folder than the avi file, with the same name except
for the extension. When a srt file has been created for
the selected file, then the sign srt is displayed
in the information panel.
![]() Delete the subtitle file .srt or
Shift+CTRL+Z :
Deletes the *.srt files associated with the selected files.
A confirmation will be asked.
Delete the subtitle file .srt or
Shift+CTRL+Z :
Deletes the *.srt files associated with the selected files.
A confirmation will be asked.